Butterfly Layered Haircut: How to Get the Voluminous Look
Discover the butterfly layered haircut, how to ask for it, how to style it at home, the best products to create bouncy volume, and a simple step-by-step tutorial.


7
✨ The Butterfly Haircut Everyone Wants for Bouncy, Voluminous Hair
If you’ve been looking for a haircut that gives you movement, volume, soft face-framing layers, and that gorgeous salon blowout effect without giving up your long hair, the butterfly layered haircut deserves a spot at the top of your list.
This is the kind of haircut that looks especially beautiful when styled with a round brush or blow-dry brush. The shorter layers around the face create that soft, sweeping shape, while the longer layers preserve the length and create movement through the ends.
The modern butterfly cut combines shorter face-framing pieces with longer layers underneath, which is why it can create the appearance of having both a shorter, bouncy hairstyle and long flowing hair at the same time.
And the beautiful hairstyle in our inspiration photo is a perfect example: long brunette layers, caramel dimension, curtain-like face framing and lots of soft volume.
Want this exact type of look? Keep reading because I’ll show you how to ask for the cut, how to style it at home, which products can help, and what to avoid when cutting it yourself.
🦋 What Exactly Is a Butterfly Layered Haircut?
Think of the butterfly haircut as a combination of:
- ✂️ Long layers
- 🦋 Shorter face-framing layers
- ✨ Crown volume
- 💨 Soft, airy movement
- 🌸 Feathered ends
- 💕 Curtain-bang-inspired framing
The defining feature is the contrast between the shorter layers around the face and the longer lengths underneath. This lets you create plenty of movement without necessarily sacrificing your overall length.
Unlike a traditional one-length haircut, the butterfly cut is designed to move. When you blow-dry the layers away from your face, they create the signature “butterfly wing” shape.
Why does it look so voluminous?
The strategically placed layers remove some weight and allow the hair to lift and move more easily. Styling the layers with a round brush or blow-dry brush exaggerates that movement and creates the bouncy finish associated with the look.
💕 Why This Haircut Is So Popular
The biggest attraction is that you can get the appearance of a shorter, voluminous hairstyle while keeping your long hair.
It’s particularly appealing if you:
- Love long hair but want more movement
- Want face-framing layers
- Want your blowout to look fuller
- Feel that your long hair looks flat
- Want a soft, feminine hairstyle
- Like the 90s-inspired bouncy blowout look
- Want a hairstyle that can be worn straight, wavy or blown out
The cut can also be customized for different hair textures and lengths rather than being a one-size-fits-all haircut.
✂️ How to Ask Your Hairstylist for This Exact Butterfly Cut
If you’re taking the inspiration photo to your stylist, show them the photo instead of relying only on the name “butterfly haircut.”
Tell your stylist something like:
“I want to keep my overall length, but I want long, blended layers with shorter face-framing pieces starting around the cheekbone/chin area. I want lots of movement and volume around my face without making the bottom look too thin.”
For the look shown here, ask for:
✂️ Face-framing
Soft layers around the face that blend gradually into the longer lengths.
✂️ Long layers
Keep most of the length while adding movement through the mid-lengths and ends.
✂️ Crown volume
Ask for enough layering around the crown to create lift without creating a choppy appearance.
✂️ Soft ends
The goal is airy movement, not harsh, disconnected layers.
Professional butterfly-cut tutorials commonly use controlled sectioning, face-framing graduation and crown layering to create this shape.
⚠️ Can You Cut a Butterfly Haircut at Home?
Yes, but I wouldn’t recommend attempting the entire haircut yourself if you’re inexperienced with haircutting.
This style looks simple in photos, but the balance between the short face-framing layers and long lengths is what makes it work.
One wrong section can result in:
- Uneven layers
- Excessively short face framing
- Thin-looking ends
- Choppy sections
- An awkward transition between layers
The safest option
If you want the exact salon-quality butterfly shape:
Get the main haircut professionally and style it yourself at home.
That’s especially important if you have very long hair or are nervous about losing length.
✂️ If You Still Want to Try a DIY Butterfly Cut
If you’re experienced with basic hair trimming and want a very subtle version, start conservatively.
You’ll need:
- Sharp haircutting scissors
- Fine-tooth comb
- Hair clips
- Hair ties
- Mirror
- Good lighting
Step 1 — Start with dry or slightly damp hair
Don’t make a dramatic cut while your hair is soaking wet because the final length and shape can look different once it dries.
Step 2 — Detangle completely
Brush through your hair and remove all knots.
Step 3 — Create your face-framing section
Separate the front sections you want to frame your face.
Start longer than you think you need.
You can always remove more later.
Step 4 — Trim very small amounts
Instead of making one large cut, make tiny adjustments and check the shape repeatedly.
Step 5 — Blend
The most important part of a butterfly haircut is the transition between the shorter face-framing pieces and the longer layers.
Don’t create a harsh line.
Step 6 — Stop before over-layering
This is where many DIY attempts go wrong.
The goal is soft movement, not dozens of short layers.
Pro tip: If you’re unsure, don’t DIY the main cut. Take your inspiration photo to a stylist and use the rest of this guide to recreate the styling at home.
💨 How to Style a Butterfly Haircut at Home
Now comes the fun part.
The styling is what really brings the butterfly layers to life.
You can have a beautifully cut butterfly hairstyle, but if the hair is allowed to dry flat, you won’t get the same dramatic shape as the inspiration photo.
Step 1 — Start with damp hair
After washing, gently towel-dry your hair.
Don’t aggressively rub it because that can create unnecessary frizz.
Step 2 — Apply heat protectant
Before using a blow dryer, round brush or hot-air brush, apply a suitable heat-protecting product.
This is particularly important because the butterfly look relies heavily on blow-drying and heat styling.
Step 3 — Add lightweight volume
Apply a lightweight volumizing mousse or root-lifting product, particularly around the crown.
Don’t overload the lengths with heavy products.
For finer hair, too much product can make the layers fall flat.
Step 4 — Rough-dry to about 70–80%
Use your blow dryer to remove most of the moisture.
At this stage, focus on lifting the roots rather than trying to create the final shape.
🦋 Step 5 — Create the Signature Face-Framing Flip
Separate the front section.
Using a large round brush or blow-dry brush, place the section underneath the hair.
Pull the hair up and away from your face while directing warm air along the hair.
Then finish with cool air.
This creates the soft outward movement that makes butterfly layers look so pretty.
✨ Step 6 — Style the Crown
Take sections from the crown and lift them upward with your round brush.
Dry them away from the scalp.
For extra volume, allow the section to cool around the brush before releasing it.
💕 Step 7 — Curl the Longer Layers
You don’t need tight curls.
The goal is a soft blowout, not ringlets.
Wrap medium-to-large sections around the brush or use a large-barrel curling tool.
Curl the front pieces away from the face.
💨 Step 8 — Finish With Cool Air
Once your layers are styled, use cool air briefly.
This helps the finished shape settle.
✨ Step 9 — Separate the Layers
Don’t brush everything flat.
Use your fingers to gently separate the layers.
You want to see:
volume → movement → separation → soft ends
🤎 Step 10 — Finish With a Tiny Amount of Serum
Apply a very small amount of lightweight serum to the ends.
Don’t put too much near the roots.
You want shine without losing your volume.
🛍️ Best Products & Tools for a Butterfly Haircut
You don’t need 10 different products to recreate this hairstyle.
A simple kit is enough:
1. Volumizing blow-dry brush
A hot-air/volumizing brush can make the round-brush technique considerably easier for beginners.
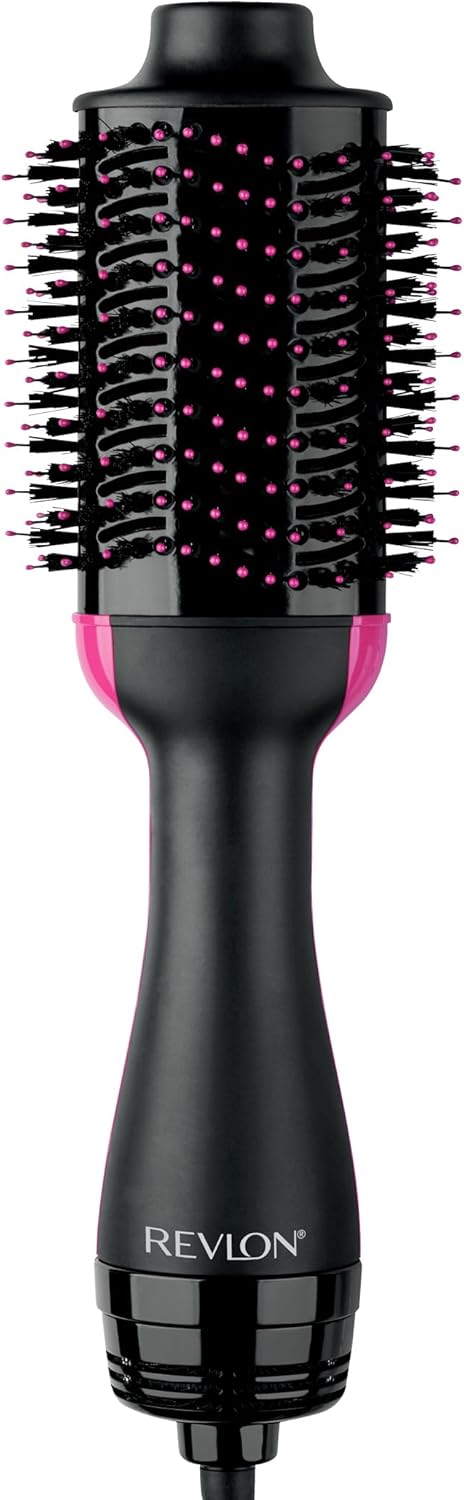
REVLON One-Step Volumizer Hair Dryer and Styler, 2.8″ Barrel, Black

Mythsight StyleVibe 6-in-1 Air Styler with Hair Dryer & Auto-Wrap Curl L/R | Blow Dryer Brush, Thermal Brush and Straightener Brush For Fast Drying

REVLON One-Step Root Booster Round Brush Hair Dryer and Styler, 1.5″ Barrel | Styling Blow Dryer Brush for Damp to Dry Hair, 3 Heat Settings

LANDOT Hair Blow Dryer Brush 60mm One-Step Hot Air Styler Blowout Volumizer | Salon Blow Dry, Ionic Anti-Frizz, Smooth Shine, Lightweight
My pick for a beginner: REVLON One-Step Volumizer Hair Dryer and Styler, 2.8″ Barrel, Black because it lets you dry and shape sections simultaneously.
2. Large round brush
If you already own a good hair dryer, you don’t necessarily need a hot-air brush.
A large round brush works beautifully for creating:
- Root lift
- Face-framing flips
- Curved ends
- Soft waves
- Blowout volume
3. Heat protectant
This should be your non-negotiable whenever you’re using significant heat.
Look for a product designed specifically for heat protection rather than relying only on hair oil.
4. Lightweight volumizing mousse
Apply it mainly around the roots and mid-lengths.
The goal is body without making the hair stiff.
5. Lightweight finishing serum
Use a tiny amount on the ends after styling.
This gives the layers a glossy, polished finish.
💰 A Simple Butterfly Hair Styling Kit
You don’t have to buy everything.
Beginner setup:
Hair dryer + round brush + heat protectant + mousse
Easier setup:
Hot-air brush + heat protectant + lightweight serum
Maximum-volume setup:
Volumizing mousse + blow dryer + large round brush + rollers + finishing serum
🦋 Butterfly Haircut Tutorial: 10-Minute Styling Routine
Once you’ve practiced the technique, you can simplify the entire process.
0:00–2:00
Apply heat protectant + volumizing mousse.
2:00–5:00
Rough-dry the roots and lengths.
5:00–7:00
Use your round brush/hot-air brush on the face-framing layers.
7:00–9:00
Create soft bends through the longer layers.
9:00–10:00
Cool the hair, separate with fingers and add a tiny amount of serum.
Done. 🦋
🌸 Butterfly Haircut for Different Hair Types
Fine Hair
Be careful with excessive layering.
Too many layers can make the ends appear thinner. For finer hair, a more controlled version with strategic face framing can create movement while preserving density. Recent hairstylist guidance for fine hair also emphasizes avoiding excessive layering and heavy products that weigh hair down.
Best styling:
Lightweight mousse + root lift + round brush.
Thick Hair
This is where butterfly layers can look particularly dramatic.
Removing strategic weight can help create movement rather than allowing thick hair to hang as one heavy mass.
Best styling:
Blow-dry brush + large sections + lightweight serum.
Wavy Hair
You can embrace your natural texture or blow it out.
Best styling:
Enhance natural waves with lightweight styling cream, or use a round brush for the classic bouncy finish.
Straight Hair
Straight hair can show the layering beautifully, but it may need more styling to maintain volume.
Best styling:
Volumizing mousse + round brush + cool-shot finish.
💕 How to Make the Butterfly Cut Last Longer
You don’t need to completely restyle your hair every morning.
Sleep with your hair loosely secured
A loose high ponytail or loose bun can help preserve some of the volume without creating a harsh crease.
Refresh the roots
On day two, use a small amount of dry shampoo or root-refreshing product if needed.
Restyle only the front
You often don’t need to redo the entire head.
Spend a few minutes refreshing:
Crown + face-framing layers + front pieces
That’s usually where the hairstyle makes the biggest visual difference.
❌ 5 Mistakes That Can Ruin a Butterfly Haircut
1. Cutting the face-framing layers too short
Start longer. You can always go shorter.
2. Creating too many layers
Butterfly layers should look blended and intentional.
3. Using too much heavy product
Heavy products can destroy the airy volume you’re trying to create.
4. Styling every section inward
The signature butterfly shape comes from movement away from the face.
5. Forgetting heat protection
Repeated heat styling without appropriate protection can contribute to dryness and damage.
🦋 The Secret to Getting This Exact Look
The haircut is only half of the equation.
The beautiful inspiration photo has three important elements:
① Face-framing layers
These create the soft shape around the cheeks and jaw.
② Long cascading layers
These preserve the overall length while adding movement.
③ Bouncy blowout styling
This is what creates the dramatic volume and makes the layers look “expensive.”
So if your butterfly haircut doesn’t look exactly like the inspiration photo after washing it, don’t panic.
The dramatic salon appearance is heavily influenced by the blowout technique.
📌 Save This Butterfly Haircut Inspiration
If you’re taking this hairstyle to your stylist, save the inspiration photo and show it to them.
Ask for:
Long butterfly layers + soft face framing + maximum movement + preserved length + bouncy blowout styling.
That description gives your stylist a much clearer idea of the finished shape than simply saying “I want layers.”
🦋 Final Thoughts
The butterfly layered haircut is one of those styles that can completely change the appearance of long hair without requiring you to give up all your length.
The secret isn’t simply adding layers.
It’s the combination of:
Strategic face framing + long layers + crown movement + correct blowout technique.
If you want the safest route, have the haircut done professionally and recreate the volume at home with a round brush or volumizing hot-air brush.
And if you’re trying to recreate the gorgeous hairstyle shown in the inspiration photo, remember:
Don’t chase the haircut alone—chase the styling technique. 🦋✨
🛍️ Recommended Tool for the Look
For someone who wants the easiest at-home route, I’d start with a volumizing hot-air brush rather than buying several separate styling tools.
REVLON One-Step Volumizer Hair Dryer and Styler, 2.8″ Barrel, Black
Why it fits this tutorial: it combines drying and brushing, making it easier to create the rounded, lifted shape needed for butterfly layers.
Affiliate disclosure
This article contains affiliate links. If you purchase through qualifying links, we may earn a commission at no additional cost to you.
🎥 Butterfly Cut Tutorial
For readers who want to see the actual cutting technique, this professional step-by-step tutorial demonstrates sectioning, face-framing, crown layering and refinement for long butterfly layers.
Important: A professional cutting tutorial is useful for understanding the technique, but if you’re inexperienced, use this YouTube video as a reference rather than attempting a dramatic haircut on yourself.